Saturday, November 1, 2014

New Breath Support Exercise

A quick plug: An article I wrote on some of the acoustical science behind overtone practice was published on Best Saxophone Website Ever. Check it out here.

In the mechanics of saxophone playing a sufficiently big air stream is the first fundamental in achieving your best possible sound. A few exercises that I have found to be helpful and directly address air stream strength and size include diaphragmatic breathing exercises, extremely high held overtones, low register breath attacks, and low register pitch bends, and I have written about these in detail in previous blog posts and in my book on sound.

Recently I have been studying bassoon, which like saxophone depends on air support for timbre but is more sensitive to air support than saxophone when it comes to pitch. It's sufficiently sensitive that vibrato can be executed via the air stream rather than the embouchure. All of this is to say I've been even more aware of my air stream, and it was through studying bassoon that I came across an exercise that works fantastically to improve air support on any wind instrument.

The Exercise

Originally meant to develop vibrato, the exercise consists of repeatedly and powerfully increasing the strength of the air stream via the abdominal muscles while holding a note. On a bassoon the pitch raises as you increase the strength of the air stream, but on saxophone all you really hear is a suddenly louder version of the same pitch. Here is one fairly complete approach to incorporating the exercise:
  • Each step should include 8-16 beats worth of pulsing the air stream
  • Start at quarter note = 80 beats per minute
  • Mouthpiece only
    •  quarter note pulses
    • 8th note pulses
    • 8th note triplet pulses
    • 16 note pulses
  • Neck and Mouthpiece
    • same sequence as mouthpiece only
  • Entire saxophone and in the middle register
    • same sequence
  • in the lower register
    • same sequence
  • in the upper register
    • same sequence
  • repeat the steps in the middle, low and high register, this time at a higher speed
  • continue to repeat and increase speed...
This is definitely a work out, and you can benefit from lighter versions of the exercise as well. It is effective at immediately increasing your air support and could/should be included in your warm up routine.


Saturday, October 18, 2014

Timbre Trainer

When it comes to saxophone, I'm a skeptic. I don't believe in marketing hype, and I don't buy into saxophone lore unless I prove it myself via trial and error. When I was contacted to do a review of a new product that vibrated your saxophone using sound files to supposedly improve its timbre I almost didn't even reply to the email. Deciding not to be rude by neglect, I did a bit of investigation. Despite the foreignness and, frankly, seeming silliness of the concept, one of the demonstration videos that showed the change in sound over the course of a few days of using the trainer seemed promising. At the same time I was wondering if the mic position was the same for each comparison recording, but either way I wanted to try the thing out for myself.

What It Is
Timbre Trainer is a vibrating speaker that you attach to your instrument. You plug the device into anything with a headphone jack and play music or whatever sound file you want and the trainer vibrates your instrument accordingly. Though the sound produced isn't very loud the vibrations seem to be stronger than playing the instrument at full volume. It is suppose to relieve the mechanical stress in your instrument and thereby improve the sound.

A Potential Explanation
The packaging for the trainer contains a spectrographic analysis of a saxophone's wave form before using the trainer and after 168 hours of using it. The comparison shows that various overtone frequencies present in the timbre have been increased, so this got my attention and I decided to see if there was any foundation to the claims. 

One potential explanation is that the vibration releases tension in the brass, which then changes the sound. A quick look on Wikipedia showed that the machining industry does use a technique called vibratory stress release (VSR), which is basically the use of vibrations to relieve stress in metal parts. By eliminating stress the metal becomes stronger and less likely to shift. You can read about VSR here.

Timbre trainer's website claims that 100 hours of use on an instrument are needed for maximum results, but this claim didn't gel with the "20 minutes to two hours" quoted by one of the companies that employs VSR in the machining industry. The details of VSR might explain that discrepancy though. When VSR is applied to machining parts, significant stress relief happens when vibrations are applied at the resonant frequency of the part meaning the pitch the part would produce if you played it like a percussion instrument. Significant stress relief also occurs, and less violently, when vibrations at subharmonics of the parts resonant frequency are employed (If you want to learn about subharmonics, also called undertones, read here). Basically, timbre trainer suggests using various frequencies for over 100 hours, but it seems like it might be possible to get the same effect with "20 minutes to two hours" (though at what strength?) at the resonant frequency or subharmonics of the resonant frequency of the saxophone.

I did mess around with finding the resonant frequency of my neck and saxophone body, but they shift when the neck is securely in place. I always applied the trainer with the neck on, and so after messing around with some tuning tracks I found a predictable subharmonic that made the saxophone audibly vibrate the most and used that a fair amount. Not very scientific, I know, but it was cool to find that predictable subharmonics made more audible vibrations.

EDIT: The concept that the device relieves mechanical stress was originally a suggestion by some of the colleagues of the device's creators at a Taiwanese university, and is somewhat controversial. There are other potential explanatins as well including the idea that vibrations could be fatiguing the metal. 

Test Subject
  • Selmer Mark VI Tenor, relacquered, serial: 98xxx.
  • Florida era Super Tone Master Otto Link, standard Link ligature.
  • Rico Jazz Select filed reeds. I used to play unfiled reeds when I played this horn regularly, and that produces a fatter and deeper sound on this horn. However, these were the reeds I use on my current setup, so being unwilling to invest time and money into yet another reed purchase, these are the reeds I employed.

Process and Jounal
I had the trainer on my horn for the recommended 100+ hours. Most of that was done with trainer positioned on my saxophone's neck, but I did put it on a few other locations including the bell and body tube on the saxophone for around 7 hours each. The majority of the 100+ hours were spent playing various music in my collection, but a significant amount of hours were spent with using the tuning track I discovered (see above in the discussion of VSR, resonant frequencies and subharmonics).

I made an initial recordings with 3 different reeds before using the trainer at all. After about 15 hours I play tested the horn again, and placebo or not, it felt different. Most noticeably the low notes had more weight and edge. I made recordings, but couldn't sense a difference. After another 10 hours the low notes sounded even better, and the whole range of the instrument had a bit more edge than before. It was still hard to hear the difference in a recording. After 41 hours total the horn felt more responsive, but I was still having difficulty hearing the difference on the recording, which was making me wonder if I was imagining the whole thing. I didn't record again until I reached 101 hours. I made the recordings earlier today, and the difference was finally audible (tracks below).

Results
Is the difference in tone significant? Yes. Is it good? Yes. What's different?  There is more core to the sound which makes it slightly darker and gives it a bit more presence. It feels more responsive and sounds more centered, and overall I enjoy playing it more. Did it change my back up Mark VI into my main horn? No, but it feels and sounds significantly better.


Monday, September 29, 2014

New Saxophone Resources and an Endorsement

The blog really hasn't gotten enough attention in the past months, but that's what happens when you're a DMA candidate I guess. Here are a few of the things that I have been wanting share. In the near future look forward to an review on something called the Timbre Trainer, a very unique piece of instrument related equipment.

A Couple of Music Related Sites
  • A new blog has surfaced, The Diligent Musician, which already has quite a lot of good information up including a healthy amount of saxophone-centric material. I got a sneak peak at the first article and it's on a great Kenny Garrett solo, so go check it out already.
  • I recently got wind of a site, yourinstrument.com, which is completely dedicated to letting users sale their instruments, a cool concept. Saxophones can be found/sold here.

Endorsement
Ben Wendel, one of my favorite saxophonists, has endorsed A Complete Approach to Overtones. He says,
"The overtone series has been one of the most important practice routines in my saxophone development. It has helped open up my sound, altissimo range and overall resonance. Ben Britton's book is a clear and well presented exploration of this world and will equally benefit beginning to advanced players."       -- Ben Wendel
For those of you who don't know how amazing Ben Wendel is, check him out...


Saturday, July 5, 2014

Leaning Out Your Embouchure: The Chris Potter Effect

I am super excited to share an embouchure concept that I've recently pinned down. The reason for my excitement, is that this technique consistently does the following: it improves the presence, punch, and harmonics present in the sound, it facilitates altissimo (makes it easier) and improves its tone, and lastly it helps avoid the tendency of becoming sharp in the upper register. I've included sound clips to prove the point at the bottom of the article so please check those out.

I've noticed that Chris Potter, particularly in recent years, has really mastered the clarity of sound and punch I'm talking about, both in his normal register and altissimo register. For that reason, and not because I have any idea about how he conceptualizes embouchure, I'm calling this particular tweak the Chris Potter effect.

Basic Embouchure Formation
Before we get into the newest technique, here is a brief review of how to approach a basic embouchure formation. The lips obviously seal around the mouthpiece and provide enough pressure on the reed to act as a fulcrum of sorts that start the reed vibrating. Embouchure pressure also serves the purpose of securing both the mouthpiece and your bottom lip position while playing. However, how much embouchure pressure and where we apply that pressure can make a big difference in the sound.

The muscles that should take the majority of the workload are at the side of your mouth or corners of your lips. Some players make the mistake of applying upward pressure at the sides of their mouth (a smiling motion), and others make the mistake of letting their corners come in towards the center (a puckering motion). Both of these motions cause your bottom lip to interfere with the reed's vibration in different ways, and you can hear it in the sound. Joe Allard taught that the bottom lip should remain flat, matching the shape of the reed. In order to do this, the corners of the mouth need to apply some downward pressure to stop the lip from coming in towards the center or upwards at the corners. A flat bottom lip is ideal in keeping the reed tension free and in it's natural shape, which will result in a clearer and louder sound. A last potential problem is the chin bunching upward applying pressure on the reed. Some players tend to do this as they move towards the upper register. Long overtones are one of the best remedies for this as they teach you to rely on proper voicing as opposed to embouchure pressure to support the pitch.

One other fairly important embouchure concept for those who are trying to get a powerful sound with some edge, typical of jazz or pop saxophone, is to make sure that your bottom lip isn't tucked too far in over your front bottom teeth, which can sometimes be a natural tendency to help provide support. Having your lip in a more rolled out position applies pressure to the reed less directly, so it requires good air support and voicing technique to support the sound. Experiment with various lip position to find the ideal amount of lip in or out for yourself. You want to find the position that gives you a big sound, but don't go so far that you lose control of it.

Leaning Out
On to the actual subject of the article, leaning out your bottom lip. I want to be clear that I do not mean rolling out your bottom lip. I've already addressed that above. What I'm talking about is a technique you  apply after you have found the ideal placement for your bottom lip. Placing your bottom lip firmly enough on the reed so that it doesn't shift, lean your bottom lip outward. The bottom lip shouldn't slide against the reed, but instead you should feel a shift in pressure. Often times saxophonist play applying a considerable amount of pressure with the upper part of the bottom lip against the reed. I'm suggesting that you create the opposite effect by consciously leaning your lip outwards as if your were trying to roll it out more (though jaw pressure keeps it from actually sliding). The motion is similar to an exaggerated frown where the top part of your bottom lip begins to turn down. In this scenario the pressure of the lip against the reed becomes centered lower on the lip, and I believe the pressure becomes more spread across the lip allowing the reed to vibrate a bit more uniformly.

While you can feel the difference in pressure in your embouchure the improvements to tone and intonation are the most telling. One big difference you will notice is that the harmonics in your tone will increase. This makes for a richer sounding tone and a more powerful one. By more powerful I mean it has more punch, carries better, and is simply louder. Your sound also becomes less grainy, and instead it gains definition and clarity. Because the upper part of the lip can sometimes be responsible for pushing up on the reed and decreasing the volume of air in the mouthpiece, by not doing so you avoid some of the danger of becoming sharp in the upper register. Overall, you will find your intonation more uniform. It's typical for players to use more and more pressure with the top part of their lip the higher they go, so as you go into the altissimo register, most players are engaging the top part of their lip against the reed. By fighting this tendency you will hear a clearer timbre in your altissimo register, and it will become more similar to the timbre of the normal register of the saxophone instead of the less appealing biting timbre that the altissimo register sometimes takes on. You will also be able to play higher.

This technique makes you rely on voicing technique rather than embouchure pressure, so you may find that you need to develop your ability to focus your air using your vocal tract to gain the full benefits of this change in embouchure. Practicing overtones is one of the best ways to do this.

Sound Clips
As always, the proof is in the playing.

The following is an example of alternating between leaning my lip out and leaning it up towards the reed throughout a long tone. I start out leaning the lip out. Then as I transition to the lip leaning in you hear the the muted timbre and sharper intonation. I clear that up by leaning my lip out again. I then repeat the cycle more subtly than before.
Long tone alternating.mp3

This is me noodling in the normal register of the horn while leaning my lip out.
Lean Lip Out Noodling.mp3
In contrast, here is me noodling without leaning my lip out.
Lean Lip In Noodling.mp3

This is a one and a half octave D major scale in the altissimo register with my lip leaning out.
Altissimo Lean Lip Out.mp3
This is the same scale without leaning my lip out.
Altissimo Lean Lip In.mp3

EDIT: PICS
I took a couple of pics to illustrate the technique. It's subtle, but you can visually see the difference.

I'm leaning my lip out here.
Here I've got my lip leaning up towards the reed. Bad idea!

Thursday, June 19, 2014

Online Workshops: Sound, Overtones, and Altissimo

Currently I'm putting together a number of online workshops for players looking to improve their sound, and for players who would like to improve their ability to play altissimo. They will take place via skype or google hangouts group video chat. They will be free to participate in, and, as the name workshop implies, they welcome you to contribute with your knowledge and experience.

Sound and Overtones Workshop
This workshop will address various techniques and approaches that improve overall sound or tone. Possible topics include embouchure, air support, tongue position, articulation, other voicing techniques, multiphonics, and overtones. If you're interested please email me at benbrittonjazz@gmail.com and include a note about your overall playing experience.

Altissimo Workshop
This workshop will be divided into two sections: one for players just beginning to play altissimo and one for players who have been playing it for a while but would like to fine tune their control and/or sound. If you are interested please email me at benbrittonjazz@gmail.com and tell me where you are in terms of altissimo.

Wednesday, June 4, 2014

Ben's First Video Blog: Why Should You Practice Overtones?

This is all about the benefits of overtone practice and relying on voicing rather than embouchure. Just in case you weren't convinced...

Monday, June 2, 2014

A Complete Approach to Overtones: Vivid Sound and Extended Range

Hey everyone, I'm happy to share that my latest effort, an in-depth treatment on overtones for saxophone, has finally come to fruition. Its purpose is to help players at all levels improve their ability to play overtones, which in turn improves your tone, your ability to get around the horn, and your ability to play in the altissimo register. The book is designed to help beginners play their first overtones but at the same time improve the ability of players who already have a four octave overtone range (and everyone in between).

Where to Get It
In Print: Amazon and Createspace (if you want to provide the author with the most support, createspace is the most direct route of supporting the print version)

Digital Ebook: Payhip

Look Inside
See excerpts from the book.
See the Table of Contents.

Note on Sound Clips
There are sound clips that accompany one section of the book 'Slurring up the Overtone Series'. This is one of the most difficult sections of the book, and for that reason I've provided sound clips. They can be downloaded here.

Endorsement and Review
"Ben Britton has put together a comprehensive volume explaining the overtone series and how to practice with it. A must-have for serious students of the saxophone." - Charles Pillow, Assistant Professor of Jazz Saxophone, Eastman School of Music

"This is a book that could very well be studied as a high school student, reviewed again at the college level, and re-reviewed throughout a professional playing career." - Bret Pimentel, full review

Benefits of Overtone Practice
From the book's introduction: "One of the most efficient ways to improve saxophone sound or tone is through overtone practice. Just a minute or two of proper overtone practice immediately increases the clarity and richness of tone as well as increases your ability to maintain a great sound while playing technically difficult music. Regularly practicing overtones will lead to consistently achieving those ends and extending your range into the altissimo register. Mastering overtones can result in a near four-octave range with a consistent and beautiful sound throughout."

What 'Complete Approach' Means
There are a number of different exercise types in the book including bugling exercises, slurred ascending overtones, scales, arpeggios, etc. Each exercise type improves a different aspect of your ability to play overtones.

Beginner Friendly
The book is designed so that someone who has never played overtones before will be able to quickly get started. Most of the exercises are progressive, so that they start out with a simple and easy version and then progress to more difficult territory. The book also includes helps and aids for easing into increasingly difficult overtones.

For Advanced Players
Most of the exercises in the text are taken to a reasonable extreme. This means that an advanced player (and I mean any advanced player you can think of) can open up to any section of the book and find an iteration of the exercise being presented that will challenge and help them.

Old and New
When I was a kid, I had the strange experience of playing a long overtone when suddenly it began slowly ascending from overtone to overtone. It topped out in some ridiculously high register, and I was floored. My friend ran into the room and asked me what I had just done, and all I could do was shrug my shoulders.

The experience has always stuck with me, and in the past two years I've explored that possibility among others to see how it could improve my ability to play the saxophone. That exploration has led me to a number of difficult yet helpful exercises. This book includes both the many helpful exercises I've been taught over the years and exercises I've created in trying to discover what is really possible with the saxophone.

For my first book, A Complete Approach to Sound for the Modern Saxophonist, click here.


Friday, May 30, 2014

The Scale Omnibus


I was recently contacted by Francesco Balena, a musician and author. He has created an awesome resource, namely an ebook, The Scale Omnibus, outlining 392 scales. It's pretty insane. It's also well put together and currently free. Check it out: www.saxopedia.com/the-scale-omnibus.

Thursday, May 22, 2014

Overtones and the Octave Key

I'm currently finishing up a new book, A Complete Approach to Overtones, Vivid Sound and Extended Range. In that spirit, today's post is on a simple yet significant discovery I made while writing the book, which has to do with how we use the octave key while playing overtones.

In the past, I was in the habit of never using the octave key for overtones. However, at a lesson with woodwind wizard, Charles Pillow, we were messing around with some difficult overtone exercises, and he was instinctively using the octave key. After some investigation I found that the octave key made overtones, in many respects, easier to play. Even more importantly, I found that using the octave key promoted better technique both in terms of embouchure and voicing.

When To Use The Octave Key
You should use the octave key on every overtone you play, with the exception of the first overtone in every series. For example, in overtone series below, you would not use the octave key on the fundamental pitch, low B-flat, or on the first overtone, middle line B-flat. You would use the octave key on the second overtone (top line F) and all higher overtones.


Benefits of Using the Octave Key
The basic mechanic at play here is that the octave key reduces the resistance or back pressure you feel when playing overtones. This allows you to more easily retain good embouchure technique and not over tighten your embouchure, a common pitfall of practicing strenuous techniques. It also allows you to more easily adjust your vocal tract (tongue, vocal chords, etc.) in shaping the now less resistant air column, which, in turn, allows for more control for less effort. This simple use of the octave key will result in much more efficient and beneficial overtone practice.

You may find playing when playing overtones with the octave key it is more difficult to reach or maintain the correct partial. This is most likely because you have become too dependent on embouchure pressure to perform overtones. Though it will seem like backtracking, learning to play overtones with the octave key will improve your sound and technique.

Prove It
A quick experiment will illustrate the principle. Play the second overtone of the B-flat series notated above (the second overtone is top line F while holding the fingering for low B-flat). Hold it out as a long tone without the octave key. 15 seconds should do the trick. Now play some music: scales, a melody, or an improvisation. Pay special attention to the tone quality, especially the clarity and impact of each new note when played under a slur. 

Now, repeat the long overtone, this time holding the octave key. Play some music again, and listen for the tone. You will notice an increased clarity of tone, a slightly lowered resistance, and each slurred note will have more impact or "pop". These are the results of less overall embouchure pressure and better voicing technique.

If you want to, you can now return to the long overtone without the octave key. You will find that just a short amount of overtone practice can calibrate or alter your technique, and you can shift back and forth between the two settings playing long overtones with and without the octave key.

I would suggest using the octave key as described above for all of your overtone practice. I don't believe that it is a better work out to do overtone practice without it, and instead is, simply, the wrong kind of work out. You will find with the octave key, your practice is more efficient and more consistent.

Shameless Plug
My new book, which is completely dedicated to overtones, should be out in about a week or so. It's designed to address overtone playing at all levels, so it has exercises to help beginners play their first overtones, but it also has extremely advanced sections that will benefit players who can already play four octaves worth of overtones. I'll put up an official release post soon...

Wednesday, May 21, 2014

First Year Complete!

I've mentioned on the blog that I'm back in school at Eastman pursuing a DMA in jazz studies. The first year was great, and I've recently uploaded a couple of videos from my end of the year recital. Enjoy (hopefully)!


Tuesday, April 1, 2014

Easier Altissimo & the G-sharp Key

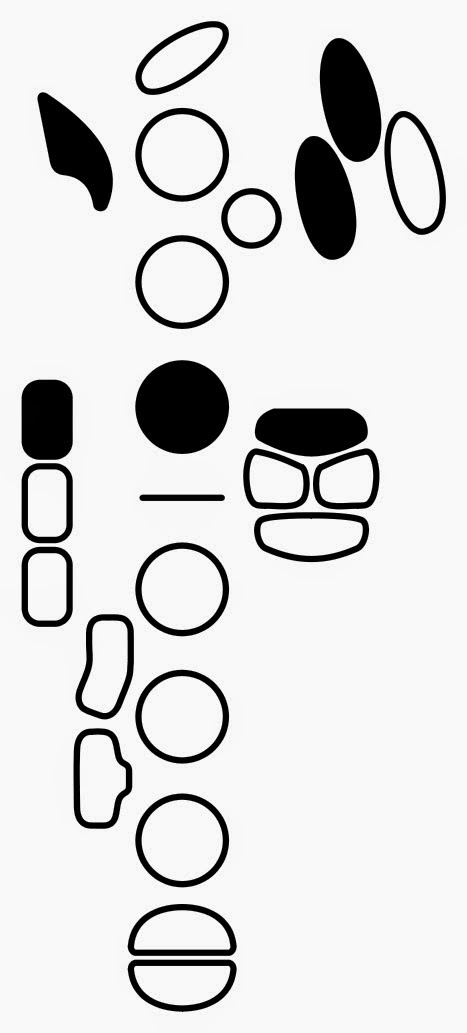
Recently I was looking at some fingerings in a Michael Brecker transcription book, and on a couple of the palm key related altissimo fingerings, the book suggested holding down the pinky G-sharp key. I tried adding G-sharp to those two typical altissimo fingerings and the notes were definitely easier to play and there was a noticeable improvement in their tone quality. A little while later I decided to experiment with holding the G-sharp key down for every altissimo fingering I could. I was pretty excited about the results. Because using the G-sharp key lowered the resistance on many of the notes in the altissimo register, my tone, ability to play expressively, and technique all noticeably improved. It really made a big difference.


Altissimo G

The first fingering where I found that adding the G-sharp key makes a noticeable difference is on altissimo G (this is on tenor). In fact, I had a student try adding the G-sharp key to the altissimo fingering he was using when working towards G, and he was able to play and sustain the note for the first time ever. For those of you who are still working on ascending into the altissimo register, I would suggest slurring up to G from F-sharp, and, of course, use the G-sharp key.

Altissimo G (w/ G-sharp key addition)


Note about G# and A

For the fingerings that I use on altissimo G-sharp and A, adding the G-sharp key doesn't actually open the G-sharp tone hole, so there is no benefit with those two fingerings. However, I do find myself holding down the pinky G-sharp when I am playing altissimo phrases that pass through G-sharp and/or A because that way I have less to coordinate when I arrive to either G below or any of the higher altissimo notes above.


B-flat on Up

Here are my fingerings for altissimo B-flat up through D all with the G-sharp key addition. The added key really makes a difference in this range.

B-flat

B


C


C-sharp


D


For altissimo E-flat up through dog-whistle G, I literally recycle these same fingerings. The added G-sharp key continues to make things a bit easier in this extreme register.

E-flat

E


F


F-sharp


G


For a general approach to the altissimo register, please check out a previous post, an Altissimo Crash Course. Also, thank you to Bret Pimentel for his very useful Fingering Diagram Builder.

Thursday, March 20, 2014

Melodic Chromaticism in Improvisation

I realize the blog has been quiet for a little while now, but that seems to be one of the side effects of being in school again and going for a doctoral degree. Anyways, you can expect a few articles over the next few weeks.

When jazz musicians first learn to play chromatically in melodic improvisation, it is often limited to the chromatic vocabulary that is integral to the jazz language, and, for some players, it can be difficult to explore beyond that. I'm going to lay out a simple concept that will hopefully give us more approaches to melodic chromaticism.

When I say melodic chromaticism, I have a specific definition. I am not referencing chord substitutions or scale substitutions like a tritone sub or the half-whole diminished scale on a dominant chord. I am referencing a more specific concept, and that is how specific chromatic notes relate to the diatonic chord/scale they are presented on. A simple example would be how the note D-flat relates to the mode C mixolydian (C7). I'm asking questions like where can D-flat go? How can I use the note D-flat in context of C mixolydian?

What are the Chromatic Tones and Tension Tones?
A basic approach that helped free me up when approaching melodic chromaticism, is to focus on the chromatic and tension notes as a set of options instead of focusing mainly on the chord tones or notes of the scale, which are beyond memorized at this point anyhow. On a C7 what are your chromatic options or other dissonant options? Assuming that the sus4 color is not being employed, the dissonant tones will be D-flat, E-flat, F, A-flat and B. You might raise an eyebrow at the F, but, though the F is diatonic to C mixolydian, it is definitely a dissonant note or, in other words, a tension tone. F-sharp has not been included in our list because, though it is chromatic to the key, it can be used as consonant note over the chord or a tone of resolution (the sharp 11). E-flat and F are also both blues notes when C7 is a tonic chord, like in a C blues or over an extended C7 vamp, which means you can use E-flat and F as dissonant resolution tones when invoking a blues color in those contexts. Below you can see the mode C mixolydian on the left (the chord tones for C7 are hollowed out), and on the right you can see the chromatic and tension tones.


How do they Resolve?
The next question is where do all of these chromatic or tension notes resolve? Following is a graphic of all the resolutions by step, with the dissonant tone first and then a possible resolution. (blues note resolutions are indicated).


You should also think of these option in context to the key. So, when C7 is a tonic like in a C blues, then you have the blue note options shown above, but if you are on a C7 in a standard tune where the key center is F, then those blue notes option change to match the the key of F. The feeling or color of the other chromatic/tension tones will also subtly change depending on your key center.

Applying it in Improvisation
By focusing on the dissonant tones as a basic set of options you are able to approach them in a variety of ways. You can use them as passing tones in a scalar passage, as neighbor tones, as appoggiaturas (dissonances approached by a leap), or various combinations of these. I would suggest improvising in a vamp setting over a single chord as exploring all the option I just listed. In a future article I'll go more in depth into these melodic gestures.

I have given you the options over C7/C Mixolydian, but each chord/scale will have its own unique dissonant tones and resolutions which I encourage you to explore and memorize them. In the next few weeks look for more articles including a couple easy techniques to improve altissimo and overtones.